Buenos días comunidad PancakeSwap!
¡Esperamos que lo hayas pasado genial durante la campaña de la Semana Beta de Pancake Protectors! Tenemos noticias aún más emocionantes para ustedes: ¡el lanzamiento oficial acaba de comenzar! Incluso si te perdiste la Semana Beta, aún puedes unirte al juego y participar en fantásticos eventos de temporada con experiencias gratificantes. Vamos a desvelar los detalles de los próximos eventos que harán que tu experiencia con Pancake Protectors sea extraordinaria. Entonces, sin más preámbulos, ¡vamos a sumergirnos en las sorpresas que tenemos reservadas para ti!
Introduciendo Pancake Protectors
Pancake Protectors, impulsado por el protocolo PvP GameFi Mobox, sumerge a los jugadores en misiones donde la ubicación estratégica de las torres de los héroes es fundamental. Lo que distingue a esta edición es la integración de CAKE, el token nativo de PancakeSwap. Esta integración permite a los jugadores utilizar tokens CAKE dentro del juego y ganar recompensas mientras disfrutan del juego.
Como comandante en Pancake Protectors, convocarás a una gran variedad de héroes para salvaguardar tus territorios a lo largo de numerosos niveles. CAKE Héroes, con sus extraordinarios atributos, te ayudarán a vencer a los adversarios de manera más efectiva, ¡y algunos de estos poderosos CAKE Héroes se pueden adquirir usando tokens CAKE!
Puedes usar Pancake Bunnies y Squads para mejorar las habilidades de tus héroes. Cada héroe se puede actualizar con solo un Bunny o Squad, que se puede aplicar a través de la sección "Héroes". Podrás usar Pancake Bunnies y Squads si tienes el NFT en tu billetera. ¡Además, puedes integrar sin problemas tu NFT en los héroes del juego y mostrarlo en tu perfil de PancakeSwap al mismo tiempo!
Acceso rápido al juego: https://protectors.pancakeswap.finance/
*Actualización de la temporada 1
Ten en cuenta que la temporada 1 finalizará a las 03:00 UTC del 12 de Junio y la temporada 2 comenzará a las 04:00 UTC del mismo día. Cada temporada durará un ciclo de 14 días.
Además de subir de nivel a tus CAKE Héroes, existen muchas otras utilidades para los token CAKE dentro del juego:
Utilidades de CAKE en Pancake Protectors
1. Acelerar la tasa de recarga y subir de nivel
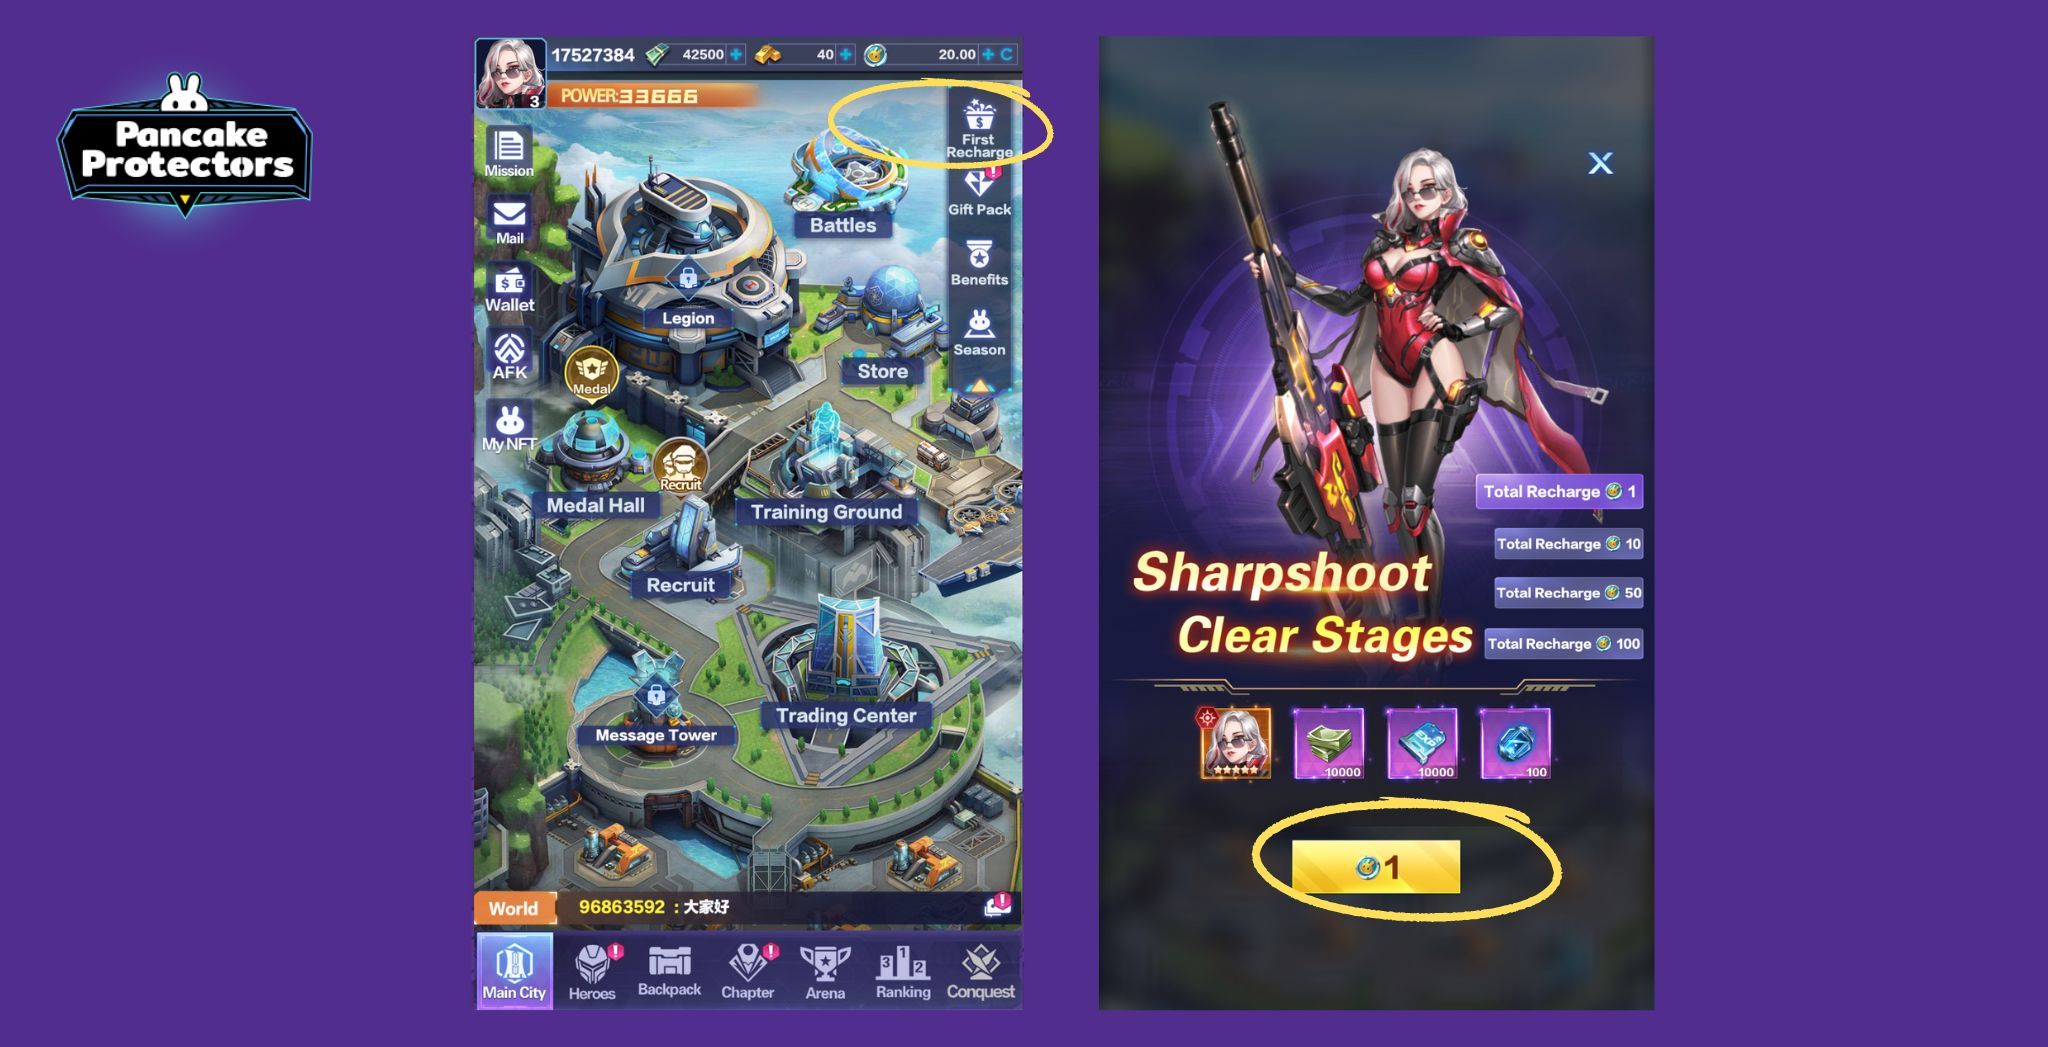
En la sección "First Recharge", puedes mejorar la tasa de recarga de ciertas funciones del juego. Este aumento en la tasa de recarga le permite progresar más rápido y tener una experiencia de juego más eficiente. También puedes consumir CAKE para acelerar su progreso de nivel y obtener ganancias sustanciales.
2. Reclamando CAKE Héroes
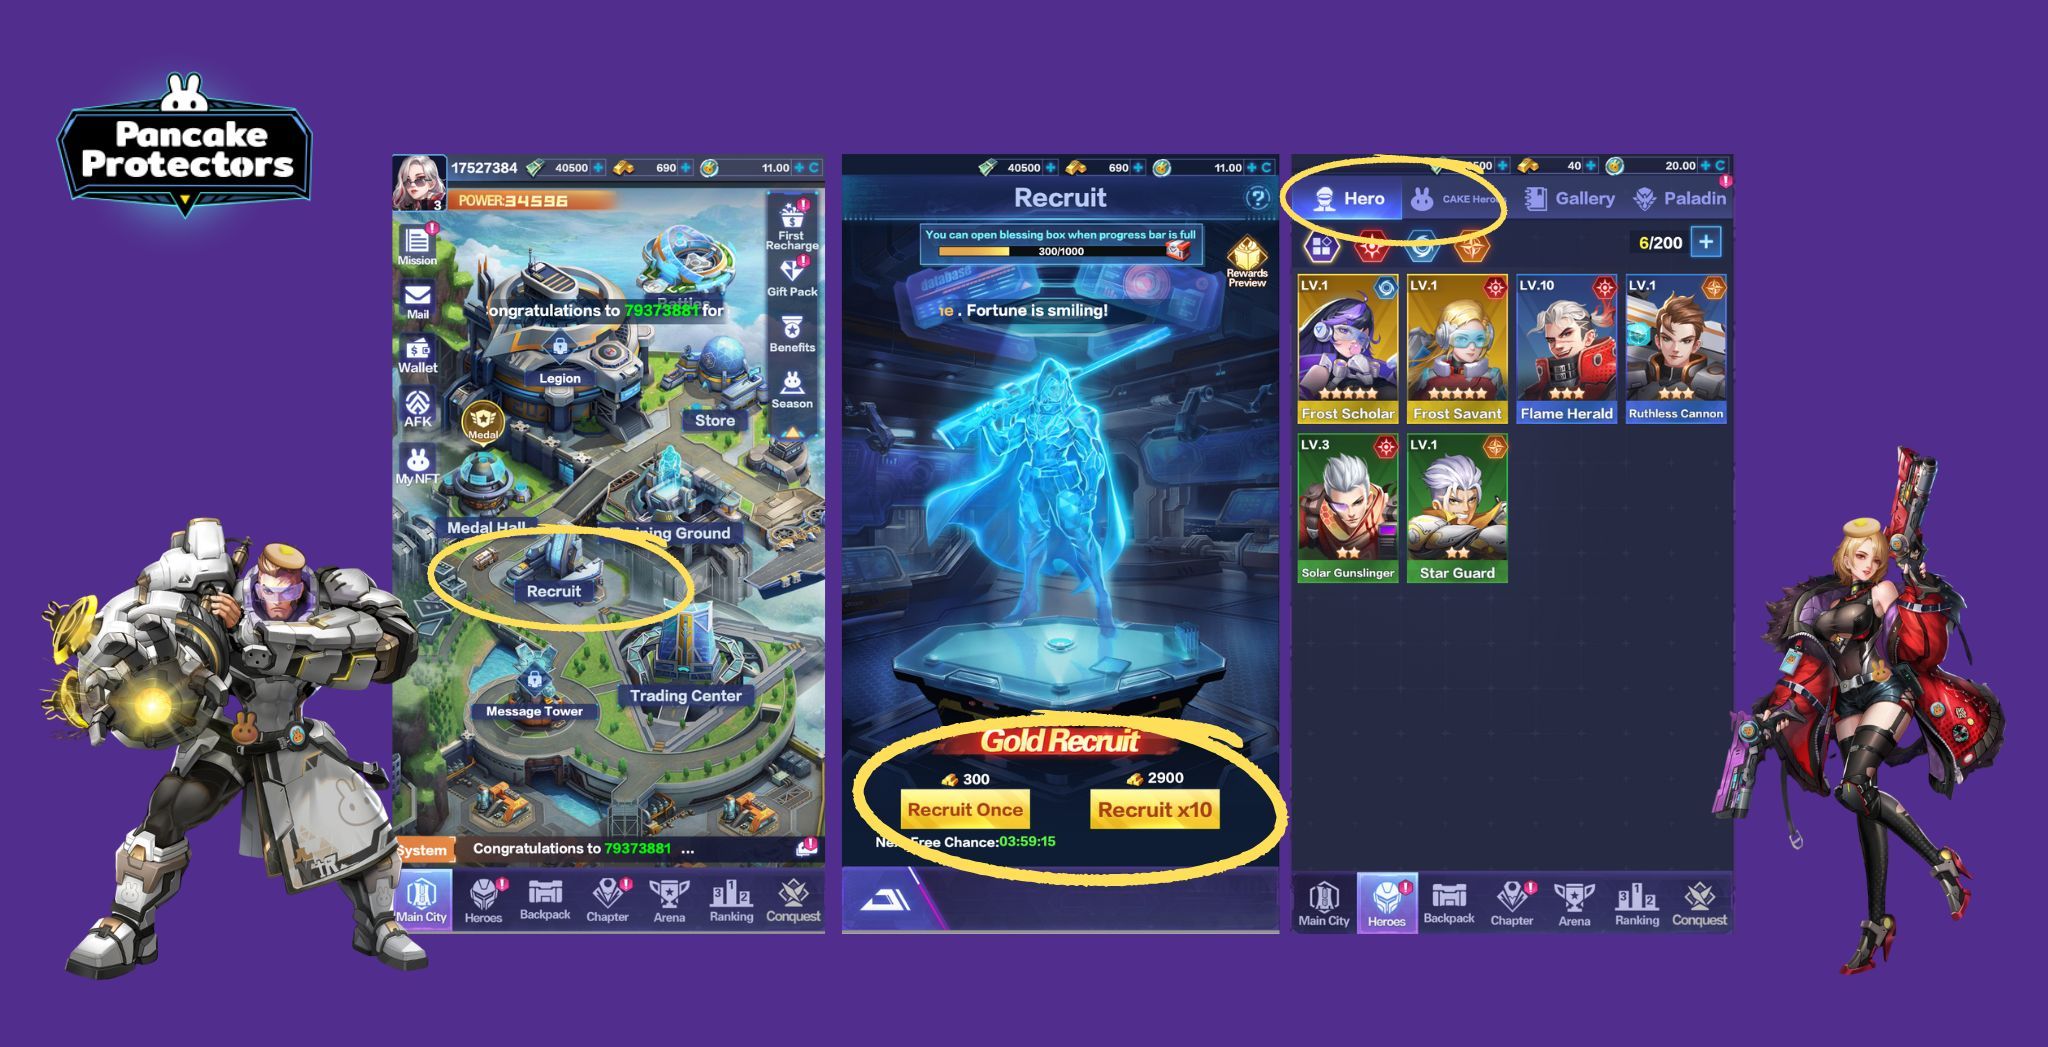
Esta es tu guía para obtener Héroes para defender tus batallas en la sección "Recruit" y gestionar a tus héroes en la sección "Heroes".
Todos los héroes se dividen en cuatro facciones: Sol, Tormenta, Estrella y Luz, siendo la Luz la facción más poderosa. Una forma de adquirir héroes es mediante el reclutamiento en la pestaña principal de la ciudad. Recibe tres oportunidades de reclutamiento gratis todos los días, o puedes adquirir cartas de reclutamiento en Daily Quests, Gold Store, Legion Store, Hero Store y Relic Store. Los holders de CAKE pueden usar CAKE para comprar oro (en la moneda del juego) para reclutar héroes, incluidos los de nivel superior: ¡Héroes de Cake!
CAKE héroes ofrece numerosos beneficios, incluida su negociabilidad en el Trading Center del juego y valores de atributos superiores a los héroes normales del mismo nivel de estrellas. El "Trading Center" del juego funciona como un centro para que los jugadores intercambien artículos entre sí. Actualmente, el único producto comercializable disponible es el héroe CAKE. Con una interfaz fácil de usar, los jugadores pueden listar sin problemas sus héroes CAKE para la venta o adquirir los listados por otros jugadores.
¡Adquirir un héroe CAKE (excluyendo los que se intercambian en el centro) también generará más Hero Points que obtener un héroe normal!
3. Desbloqueando Level Fund, Battle Pass y Privilege Card
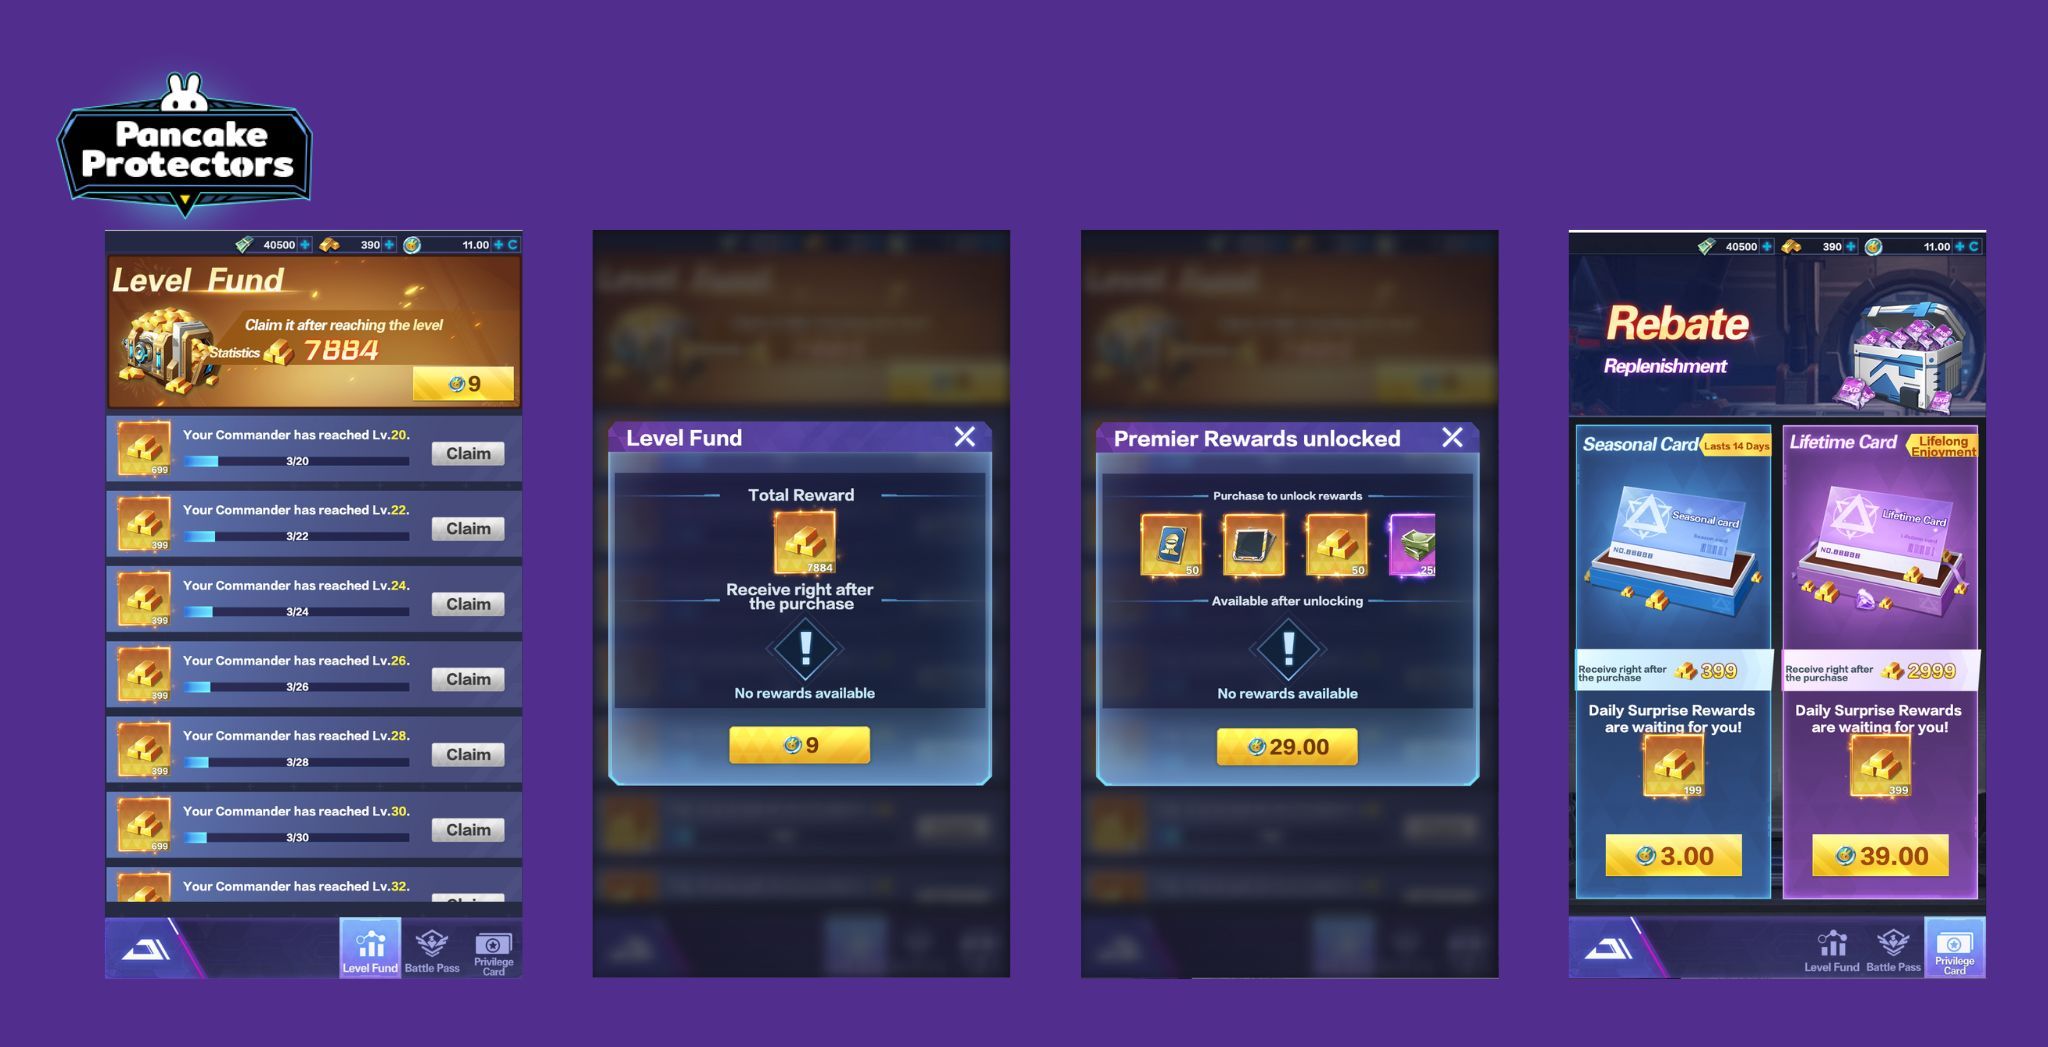
Level Fund, Battle Pass, y Privilege Card se pueden encontrar en la sección "Benefits''. El Level Fund representa la cantidad de oro que necesitas desbloquear para el siguiente nivel y, como mencionamos, puedes comprar oro usando CAKE.
El Battle Pass es un sistema de progresión que ofrece una estructura de recompensas escalonada. Al usar CAKE, puedes desbloquear varias recompensas a medida que avanzan a través de estos niveles completando tareas en el juego, desafíos o ganando puntos de experiencia. El Battle Pass Premium ofrece recompensas más lucrativas, incluidas monedas del juego, ítems exclusivos como skins o avatares, artículos consumibles, potenciadores y otras bonificaciones.
La Privilege Card es una membresía única que puedes obtener usando CAKE. Te otorga privilegios o bonificaciones específicas, que incluyen una mayor ganancia de experiencia, mayor posibilidad de obtener elementos raros, tiempos de recuperación reducidos para habilidades y acceso a funciones o áreas exclusivas.
4. Compra de oro y paquetes de regalo

Puedes usar CAKE para comprar la moneda del juego, oro, para subir de nivel y varios propósitos. Además, usa CAKE para abrir regalos en la sección "Gift Pack", que incluye opciones como el Daily Gift, el Season Gift y One-Time Gift Pack.
5. Staking CAKE para ganar recursos
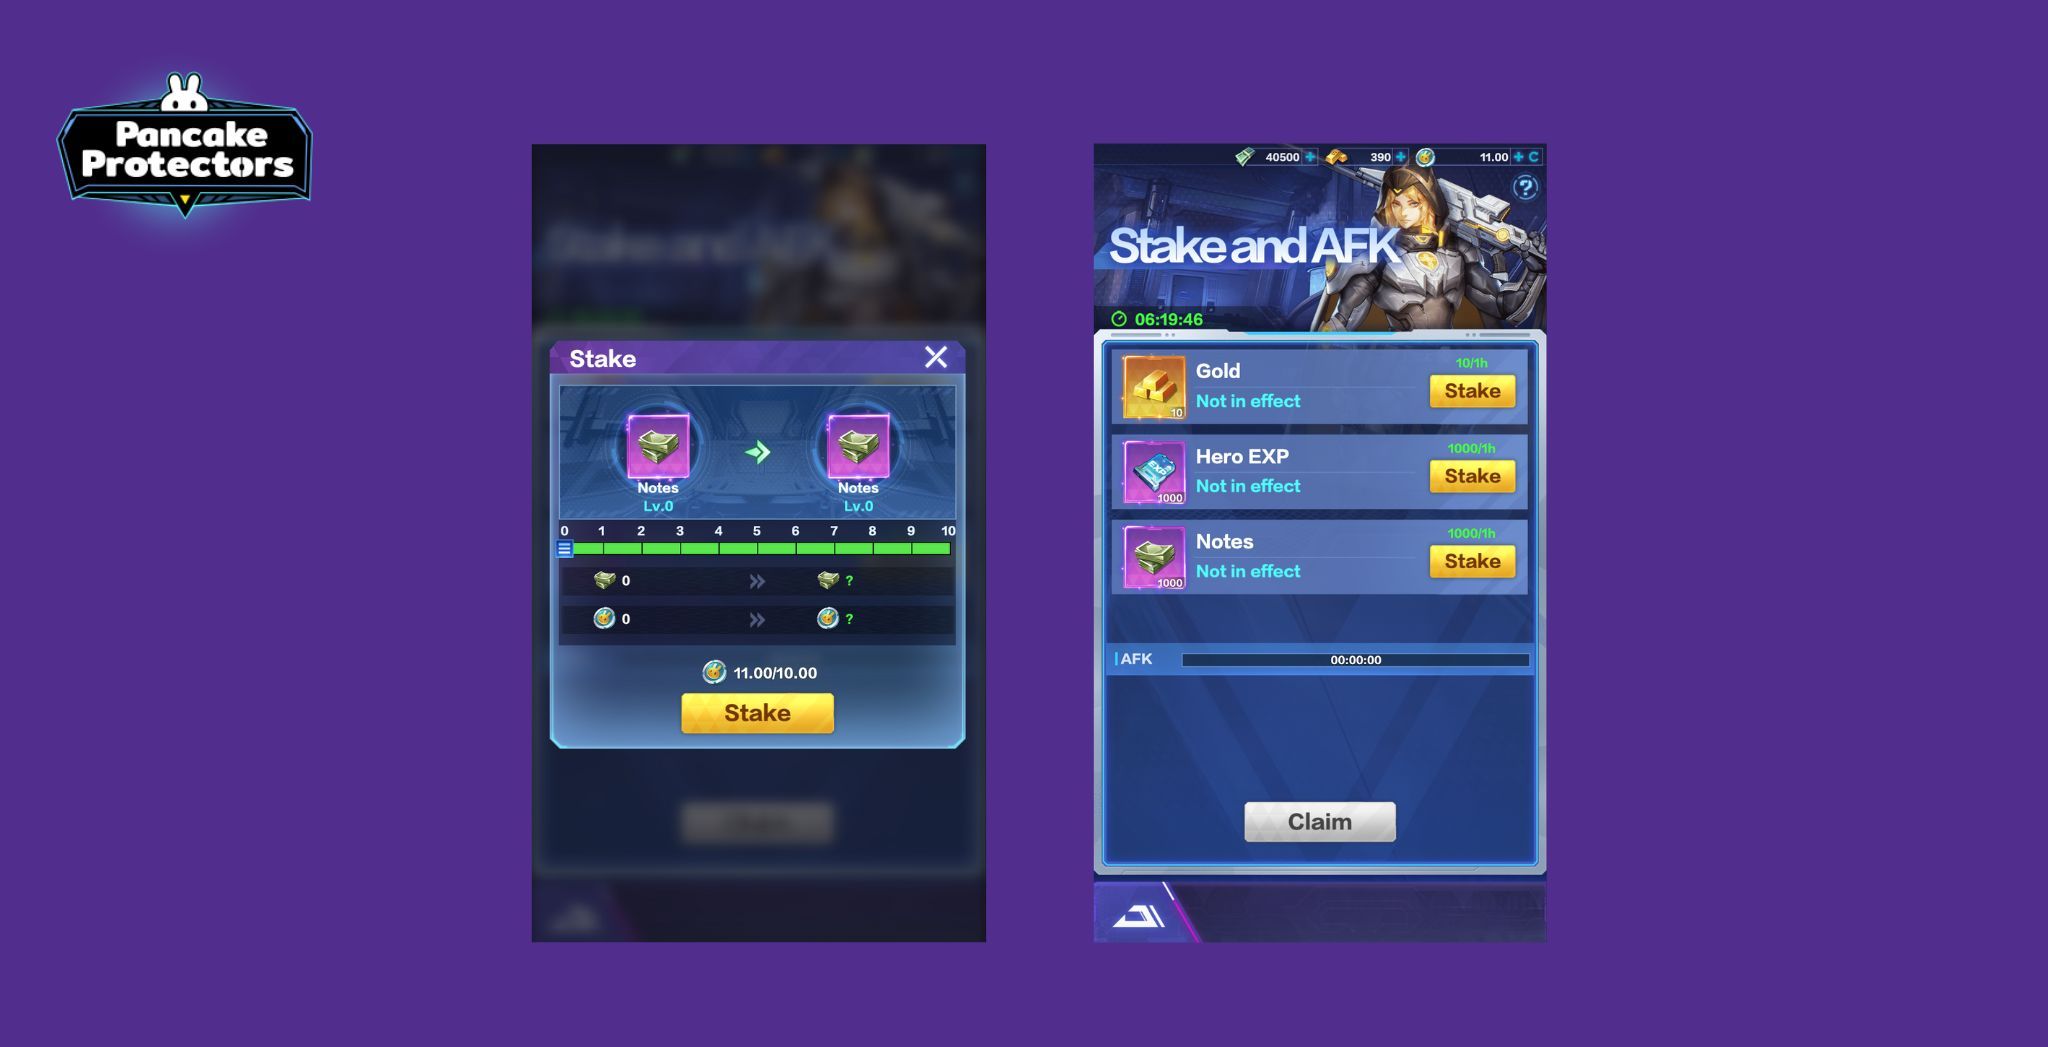
Stake tus CAKE en "AFK" para ganar recursos adicionales como Gold, HERO EXP y Notes. Hay 10 niveles para depositar, y cada nivel ofrece recursos cada vez más avanzados. Ahora, ¡preparémonos para las recompensas de temporada!.
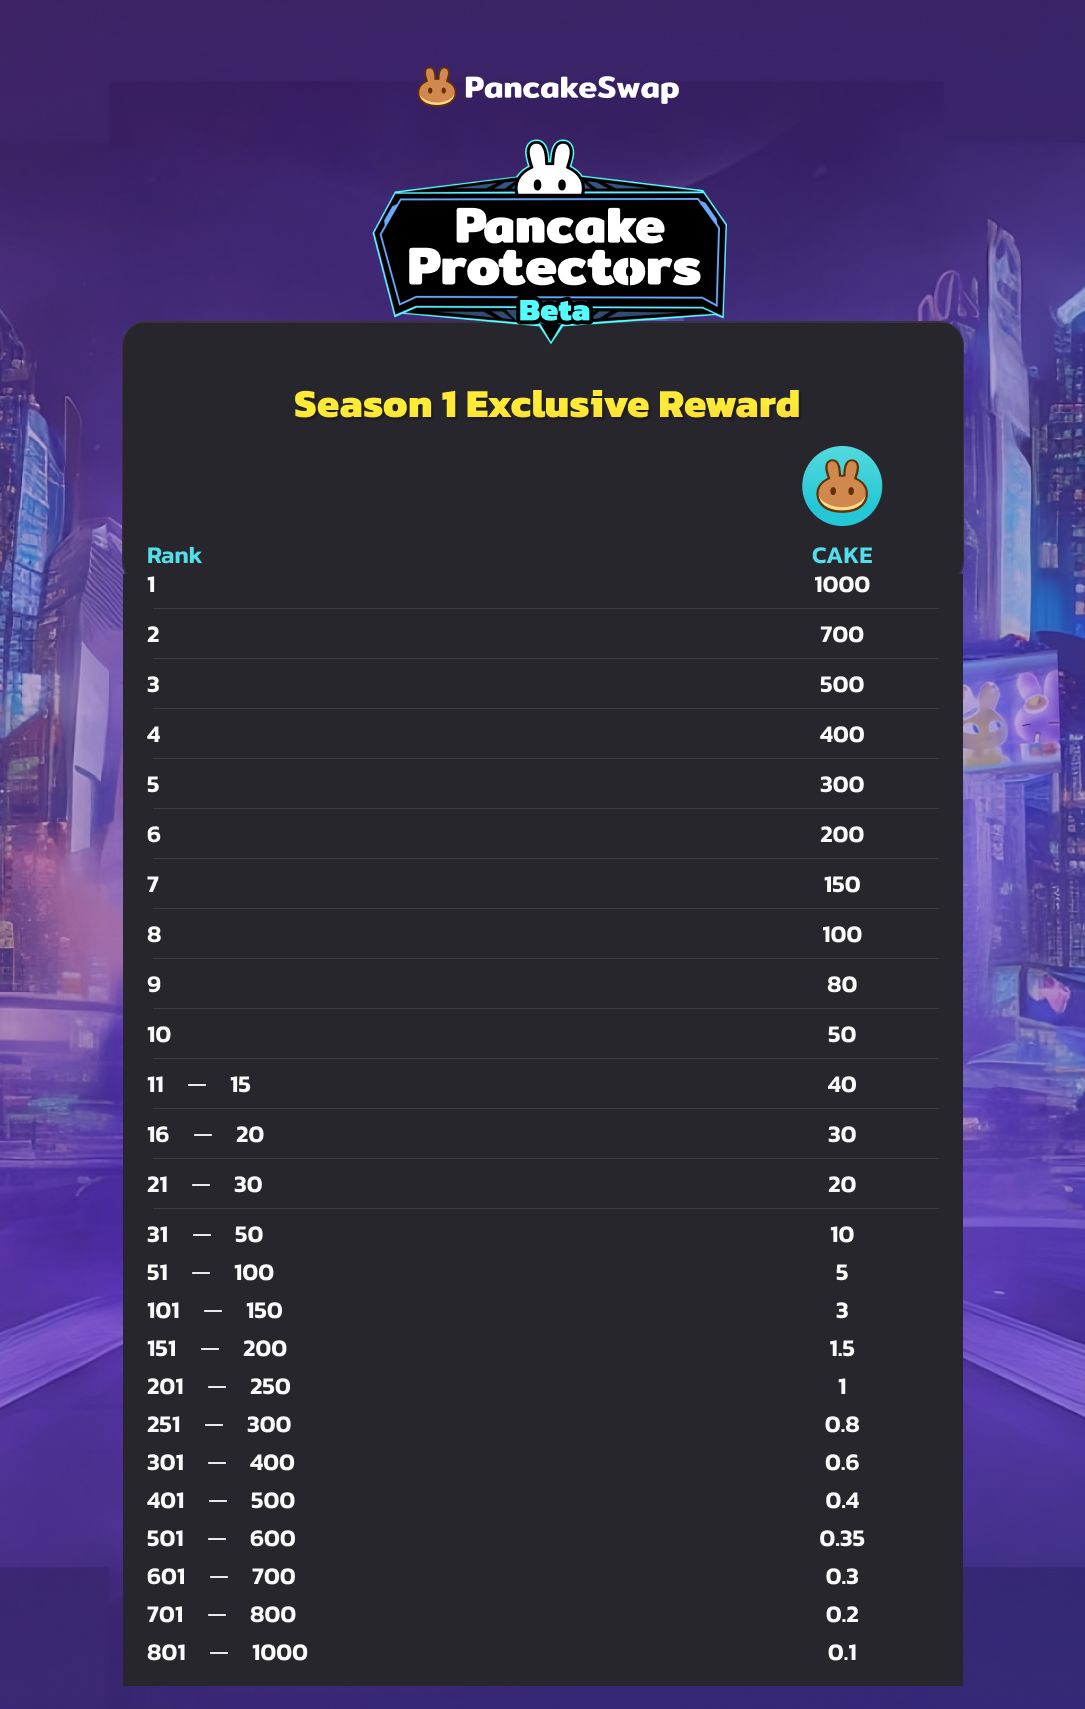
1. Recompensas exclusivas de la tabla de clasificación de la temporada 1:
En la temporada 1, ¡tenemos premios adicionales exclusivos para los jugadores de esta temporada! Encabeza las listas en la arena (tabla de clasificación competitiva) o en la tabla de héroes (tabla de clasificación de consumo) y los ganadores serán recompensados con un total de 10.000 CAKE. ¿Te preguntas cómo se distribuirán estos premios en las tablas de clasificación? Vamos a sumergirnos en los detalles:
2. Lotería de Temporada
Unirse a la lotería de temporada implica el uso de tickets de lotería. Desbloquea tickets de lotería a través de juegos y actividades.
Ahora, ¿qué hay para ti?
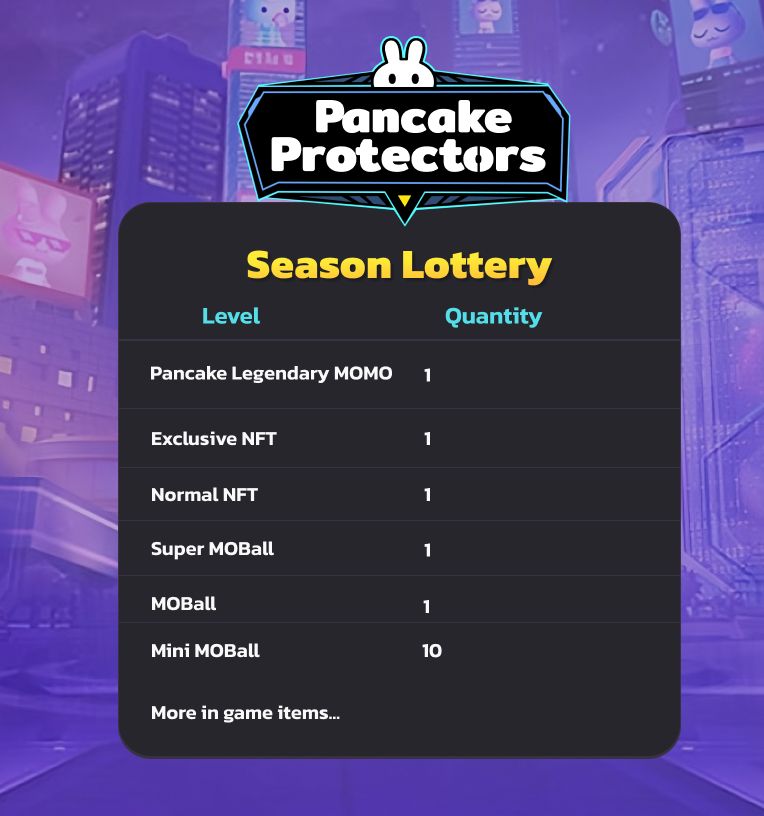
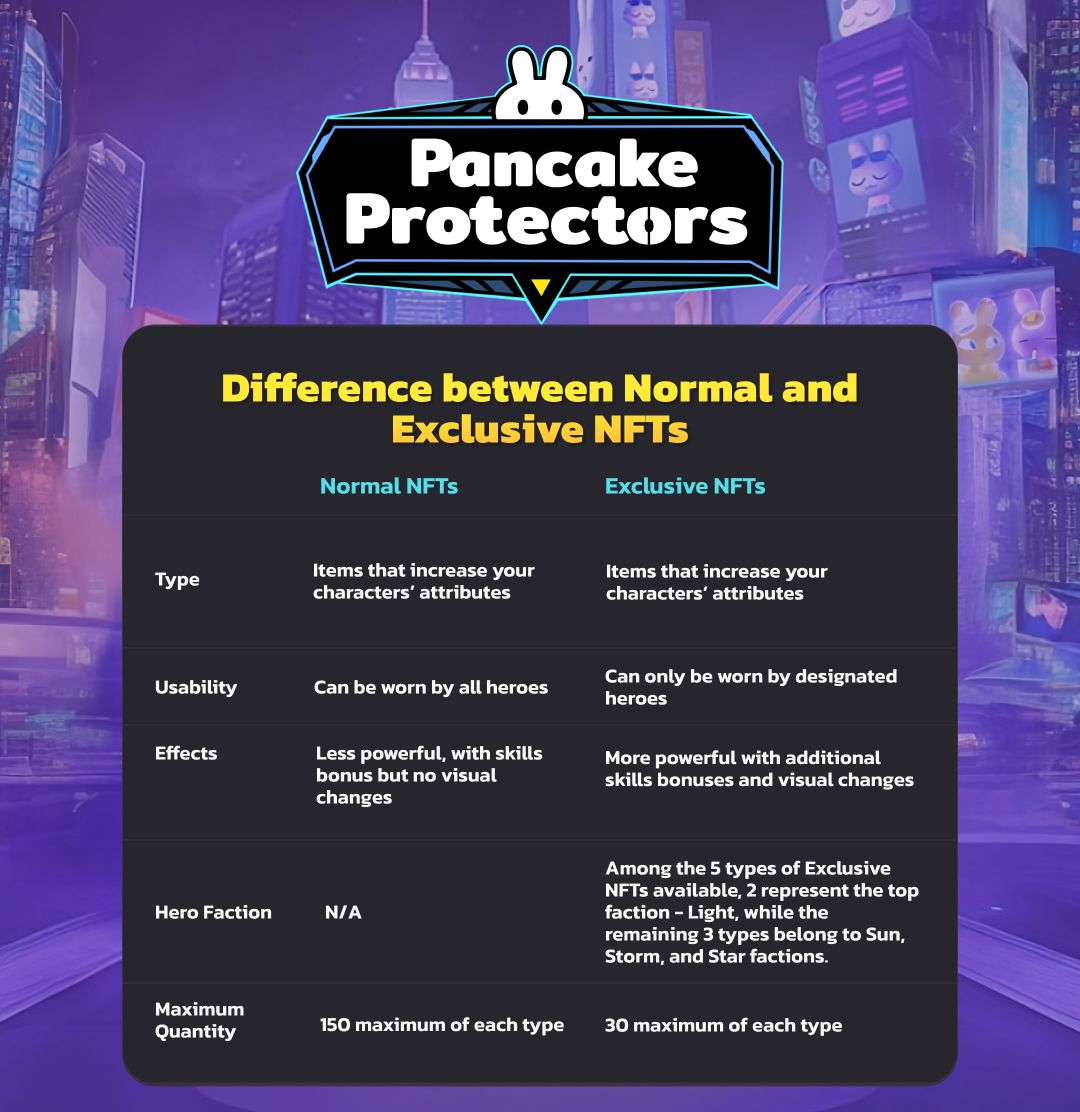
Cada temporada en Pancake Protectors trae una lotería, que ofrece a los jugadores la oportunidad de obtener recompensas. Los jugadores pueden ganar Pancake Legendary MOMO, un activo poderoso que equipa a los héroes con las habilidades adicionales más poderosas. Los jugadores también pueden obtener un NFT exclusivo o un NFT normal, los cuales llegan en cajas sorpresa y tienen el poder de mejorar los atributos de los héroes. Las recompensas también incluyen MOBalls, incluido un Super MOBall, un MOBall y diez Mini MOBalls cada temporada. Los jugadores con tickets de lotería avanzados aumentan sus posibilidades de reclamar estas recompensas, haciendo de cada nueva temporada una nueva aventura.
No te pierdas el cautivador juego de defensa de la torre, ventajas exclusivas para los holders de PancakeSwap Bunnies y Squads y fantásticas recompensas de temporada. No pierdas tiempo y visita: https://protectors.pancakeswap.finance/ para emprender un viaje inolvidable en Pancake Protectors. Si tienes más preguntas, consulta nuestras: Preguntas Más Frecuentes
¡Únete a tus héroes, protege tus territorios y obtén la victoria en este emocionante mundo de aventuras!.
Los Chefs
Términos y condiciones
- La campaña de temporada está limitada a los usuarios de PancakeSwap que participaron en los juegos de Pancake Protectors a través del sitio oficial de juegos Pancake Protectors
- PancakeSwap descalificará cualquier entrada de los participantes que no cumplan con los requisitos de elegibilidad determinados única y absolutamente por PancakeSwap y Mobox.
- PancakeSwap se reserva el derecho de cancelar la Campaña o modificar la mecánica o las reglas de la Campaña en cualquier momento a nuestro exclusivo criterio y sin previo aviso.
- En caso de disputa, PancakeSwap y Mobox se reservan el derecho de tomar todas las decisiones finales con respecto a la Campaña.
Sobre PancakeSwap
PancakeSwap es un Exchange Descentralizado Multichain líder que opera en un modelo de creador de mercado automatizado (AMM) construido en BNB Chain, Ethereum y Aptos. Lanzado en 2020, PancakeSwap es uno de los DEX más populares en la industria de las criptomonedas debido a sus bajos fees de transacción, comercio de alta velocidad y plataforma fácil de usar. PancakeSwap tiene más de $ 462MM en volumen total de operaciones y más de $ 2.5MM en liquidez total bloqueada, lo que lo convierte en el DEX Multichain líder en la industria. Para obtener más información, visite https://pancakeswap.finance/.
Sobre Mobox
MOBOX es un protocolo Gamefi construido en BNB Chain. Al combinar los mejores elementos del Yield Farming y los NFT para juegos, MOBOX establece un próspero ecosistema de Gamefi. Al utilizar Binance Smart Chain (BSC), MOBOX muestra una interoperabilidad genuina de NFT a través de una funcionalidad perfecta entre redes y plataformas. La plataforma está impulsada por la comunidad y recompensa activamente a los usuarios por su participación y disfrute.